PowerShell Enumerate Folder with -exclude and returning resulting folders/files

Create a Batch file containing the following:

@echo off
@echo 100...
@powershell "Get-ChildItem -Path \\192.168.1.1\Data\Splitting\100_*.* | Select-Object FullName"
@echo Alle anderen (ausser excluded)...
@powershell "Get-ChildItem -Path \\192.168.1.1\Data\Splitting\*.* -Exclude @('100_*.*','_a file to exclude containing Spaces.bat') | Select-Object FullName"
pause

T-SQL Transform/Pivot XML Data to usable Data Rows using XQuery language elements

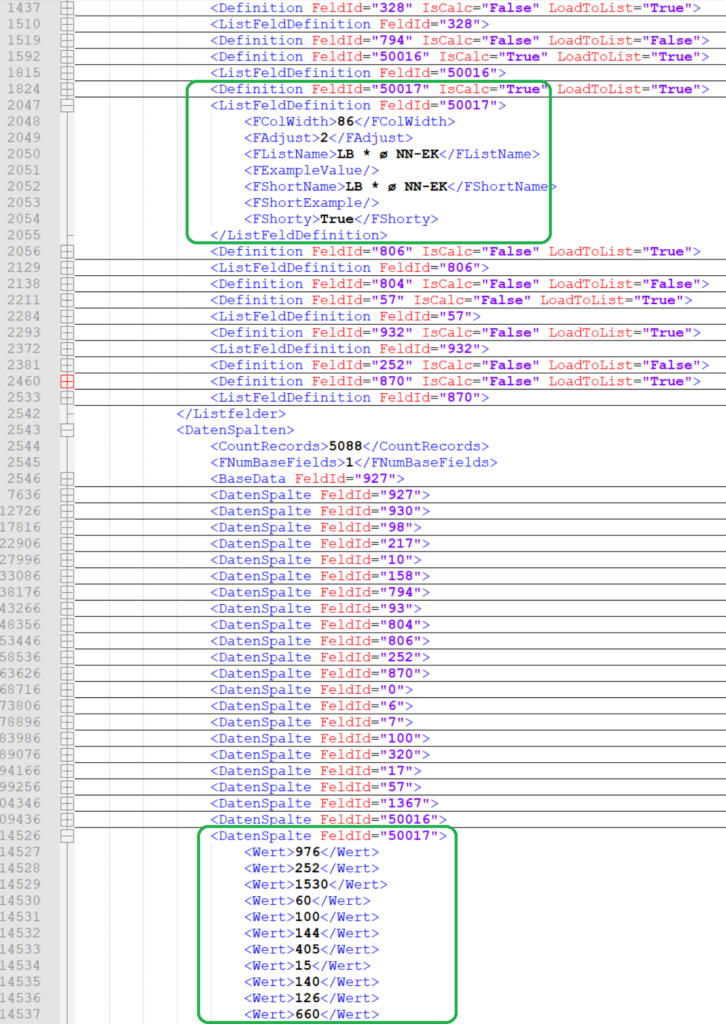
The Key to get this XML-2-Rows solution to work is to use an embedded .query(‘./Wert’) as Wert to enumerate each attribute’s value beneath a given element type dsData(b) and bsDatas(b).

Another important point is to add a ROW_NUMBER() to each value’s line to allow allocation of values between different element types.
The last WHERE statement demonstrates how values of a single row (7) or a specific element 50017 are selected.

CREATE TABLE unittest.XmlAuswertung (ID int IDENTITY(1,1) NOT NULL, XmlResult xml NOT NULL)

INSERT INTO unittest.XmlAuswertung (XmlResult)
VALUES (N'YOURXMLWITHOUT<?xml...?>HEADER');

DECLARE @xml XML;

SELECT TOP 1 @xml = XmlResult
FROM unittest.XmlAuswertung;

SELECT	  def.value('@FeldId', 'int') as DefFeldID
		, def.value('Name[1]', 'varchar(255)') as DefName
	--,	def.value('.', 'varchar(100)') as DefTitle
FROM @xml.nodes('/Auswertungsreport/Listen/Liste/Listfelder/Definition') as definitionen(def)
;

SELECT	  c.value('CountRecords[1]', 'int') as CountOfRecords
FROM @xml.nodes('/Auswertungsreport/Listen/Liste/DatenSpalten') as CountOfRecords(c)
;

--SELECT	  b.value('@FeldId', 'int') as BDFeldID
--		, b.query('./Wert') Werte
--FROM @xml.nodes('/Auswertungsreport/Listen/Liste/DatenSpalten/BaseData') as baseDatas(b)

--SELECT 
--	  bWerte.BDFeldID
--	, ROW_NUMBER() OVER ( ORDER BY ( SELECT 1 ) ) rowId
--	, w.value('.', 'nvarchar(4000)') as Wert		
--FROM 
--(
--		SELECT	  b.value('@FeldId', 'int') as BDFeldID
--				, b.query('./Wert') Werte
--		FROM @xml.nodes('/Auswertungsreport/Listen/Liste/DatenSpalten/BaseData') as baseDatas(b)
--) bWerte
--CROSS APPLY bWerte.Werte.nodes('./Wert') as Werte(w)


;WITH felder
AS
(
	SELECT	  def.value('@FeldId', 'int') as DefFeldID
			, def.value('Name[1]', 'varchar(255)') as DefName
			, def.value('FListNameShort[1]', 'varchar(50)') as DefAbk
		--,	def.value('.', 'varchar(100)') as DefTitle
	FROM @xml.nodes('/Auswertungsreport/Listen/Liste/Listfelder/Definition') as definitionen(def)
)
, werte
AS
(
	SELECT 
		  bWerte.FeldID
		, ROW_NUMBER() OVER ( PARTITION BY FeldID ORDER BY ( SELECT 1 ) ) rowId
		, w.value('.', 'nvarchar(4000)') as Wert		
	FROM 
	(
			SELECT	  b.value('@FeldId', 'int') as FeldID
					, b.query('./Wert') Werte
			FROM @xml.nodes('/Auswertungsreport/Listen/Liste/DatenSpalten/BaseData') as baseDatas(b)
	) bWerte
	OUTER APPLY bWerte.Werte.nodes('./Wert') as Werte(w)

	UNION ALL

	SELECT 
		  bWerte.FeldID
		, ROW_NUMBER() OVER ( PARTITION BY FeldID ORDER BY ( SELECT 1 ) ) rowId
		, w.value('.', 'nvarchar(4000)') as Wert		
	FROM 
	(
			SELECT	  b.value('@FeldId', 'int') as FeldID
					, b.query('./Wert') Werte
			FROM @xml.nodes('/Auswertungsreport/Listen/Liste/DatenSpalten/DatenSpalte') as dsData(b)
	) bWerte
	OUTER APPLY bWerte.Werte.nodes('./Wert') as Werte(w)

)
SELECT f.*, w.rowId, w.Wert
FROM felder f
INNER JOIN werte w	ON	w.FeldID = f.DefFeldID
WHERE w.rowId = 7
OR w.FeldID = 50017

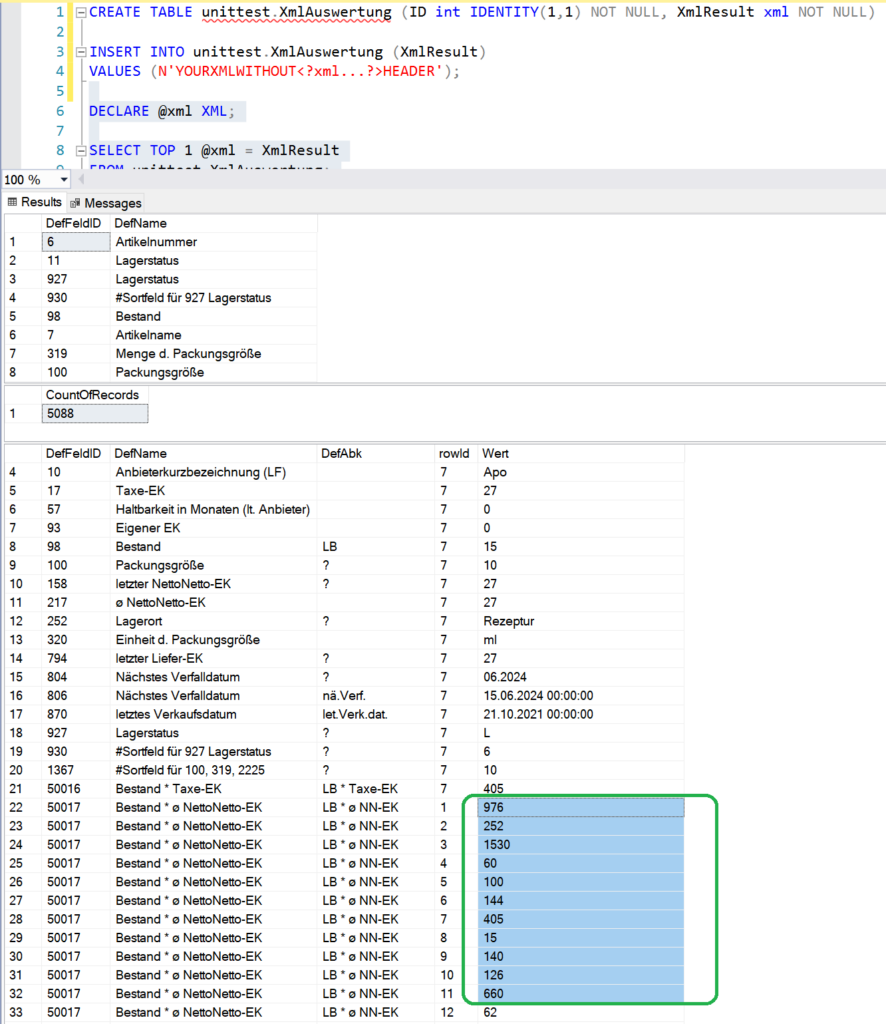
If you select and executing all SQL text starting at DECLARE @xml XML;
The following three result sets would be returned to client.
(1) the Field Definitions Ids and Names (DefFeldID, DefName)
(2) a selected single value CountOfRecords
(3) the big result joining the Field definition and the corresponding values of <WERT>Data</Wert> in XML data.

CMD Take Ownership OF Files Recursive

Change recursively the Owner of all files and folders in the current’s folder DWH to Administrators Group:

takeown /F DWH /R /A /D Y /SKIPSL

takeown /F [FolderOrFilePattern] /R /A /D Y /SKIPSL


TAKEOWN [/S System [/U Benutzername [/P [Kennwort]]]]
/F Dateiname [/A] [/R [/D Aufforderung]]

Beschreibung:
Dieses Tool ermöglicht einem Administrator das Wiederherstellen des
Zugriffs auf eine Datei, für die der Zugriff durch erneutes Zuweisen
des Besitzers verweigert wurde.

Parameterliste:
/S System Bestimmt das Remotesystem mit dem eine
Verbindung hergestellt werden soll.

/U [Domäne\]Benutzer Bestimmt den Benutzerkontext, unter
dem der Befehl ausgeführt werden soll.

/P [Kennwort] Gibt das Kennwort für den jeweiligen
Benutzerkontext an. Zeigt eine Eingabe-
aufforderung an, wenn keine Eingabe
vorgenommen wurde.

/F Dateiname Gibt das Dateinamen- oder Verzeichnis-
namenmuster an. Platzhalter “*” können
verwendet werden,um das Muster anzugeben.
Ermöglicht die Angabe von Freigabename\
Dateiname.

/A Überträgt die Besitzrechte an die Gruppe
“Administratoren” anstelle des aktuellen
Benutzers.

/R Rekursiv: Weist das Tool zur Bearbeitung von
Dateien im angegebenen Verzeichnis und allen
Unterverzeichnissen an.

/D Aufforderung Standardantwort, die verwendet wird, wenn der
aktuelle Benutzer nicht die Berechtigung
“Ordner auflisten” für ein Verzeichnis hat.
Tritt bei der rekursiven Bearbeitung (/R)
von Unterverzeichnissen auf. Gültige Werte
sind “Y” zum Übernehmen der Besitzrechte
oder “N” zum Auslassen dieses Schrittes.

/SKIPSL Keiner symbolischen Verknüpfung folgen.
Nur mit “/R” zulässig.

/? Zeigt die Hilfemeldung an.

HINWEIS: 1) Wenn “/A” nicht angegeben wird, werden die Besitzrechte für
die Datei dem derzeit angemeldeten Benutzer übertragen.

2) Gemischte Muster mit “?” und “*” werden nicht unterstützt.

3) “/D” wird verwendet, um die Bestätigungsaufforderung zu
unterdrücken.

Beispiele:
TAKEOWN /?
TAKEOWN /F Dateiname
TAKEOWN /F \\system\share\lostfile /A
TAKEOWN /F directory /R /D N
TAKEOWN /F directory /R /A
TAKEOWN /F *
TAKEOWN /F C:\Windows\System32\acme.exe
TAKEOWN /F %windir%\*.txt
TAKEOWN /S System /F EigeneFreigabe\Acme*.doc
TAKEOWN /S System /U Benutzer /F EigeneFreigabe\EigeneBinärdatei.dll
TAKEOWN /S System /U Domäne\Benutzer /P Kennwort /F Freigabe\Dateiname
TAKEOWN /S System /U Benutzer /P Kennwort /F Dokumente\Report.doc /A
TAKEOWN /S System /U Benutzer /P Kennwort /F EigeneFreigabe\*
TAKEOWN /S System /U Benutzer /P Kennwort /F Startseite\Anmelden /R
TAKEOWN /S System /U Benutzer /P Kennwort /F EigeneFreigabe\Verzeichnis
/R /A

UWP broadFileSystemAccess & MIME File Types in Package Manifest

For a list of almost every MIME File Type, see here:

Common MIME types – HTTP | MDN (mozilla.org) and
All known MIME types (digipres.org)

The Key to success for BroadFileSystemAccess is to add it by hand to the XML Manifest and follow the information from MSDN (App capability declarations – UWP applications | Microsoft Docs):

The broadFileSystemAccess capability allows apps to get the same access to the file system as the user who is currently running the app without any additional file-picker style prompts during runtime. It is important to note that this capability is not required to access files that the user has already chosen using the FilePicker or FolderPicker.

This capability works for the Windows.Storage APIs. Because users can grant or deny the permission any time in Settings, you should ensure that your app is resilient to those changes. In the April 2018 update, the default for the permission is On. In the October 2018 update, the default is Off. It is also important that you do not declare any special folder capabilities such as DocumentsPictures, or Videos with this capability. You can enable this capability in your app by adding broadFileSystemAccess to your manifest. For an example, see the File access permissions article.

<Package xmlns="http://schemas.microsoft.com/appx/manifest/foundation/windows10" 
  xmlns:mp="http://schemas.microsoft.com/appx/2014/phone/manifest" 
  xmlns:uap="http://schemas.microsoft.com/appx/manifest/uap/windows10" 
  xmlns:uap3="http://schemas.microsoft.com/appx/manifest/uap/windows10/3" 
  xmlns:rescap="http://schemas.microsoft.com/appx/manifest/foundation/windows10/restrictedcapabilities" 
 IgnorableNamespaces="uap mp uap3 rescap">

...

  <Applications>
    <Application Id="App" Executable="$targetnametoken$.exe" EntryPoint="YOURAPP.App">
      <Extensions>
        <uap:Extension Category="windows.fileTypeAssociation">
          <uap:FileTypeAssociation Name="YourFileTypeAssociation">
            <uap:DisplayName>YOURDISPLAYNAME</uap:DisplayName>
            <uap:SupportedFileTypes>
              <uap:FileType ContentType="image/jpeg">.jpeg</uap:FileType>
              <uap:FileType ContentType="image/png">.png</uap:FileType>
              <uap:FileType ContentType="application/pdf">.pdf</uap:FileType>
              <uap:FileType ContentType="image/tiff">.tif</uap:FileType>
              <uap:FileType ContentType="image/tiff">.tiff</uap:FileType>
              <uap:FileType ContentType="image/jpeg">.jpg</uap:FileType>
              <uap:FileType ContentType="text/plain">.txt</uap:FileType>
              <uap:FileType ContentType="application/vnd.openxmlformats-officedocument.wordprocessingml.document">.docx</uap:FileType>
              <uap:FileType ContentType="application/msword">.doc</uap:FileType>
              <uap:FileType ContentType="text/csv">.csv</uap:FileType>
              <uap:FileType ContentType="image/gif">.gif</uap:FileType>
            </uap:SupportedFileTypes>
          </uap:FileTypeAssociation>
        </uap:Extension>
      </Extensions>
    </Application>
  </Applications>
  <Capabilities>
    <Capability Name="internetClientServer" />
    <Capability Name="privateNetworkClientServer" />
    <Capability Name="internetClient" />
    <uap:Capability Name="enterpriseAuthentication" />
    <rescap:Capability Name="broadFileSystemAccess"/>
  </Capabilities>
</Package>


UWP Resize ContentDialog MaxWidth & MaxHeight

To Resize (eventually edit the Height or Width to a higher value) the ContentDialog(s) you need to add the following lines to your App.xaml file and edit the Max values as you wish.

<Application.Resources>
    <x:Double x:Key="ContentDialogMaxWidth">1000</x:Double>
    <x:Double x:Key="ContentDialogMaxHeight">1000</x:Double>
</Application.Resources>


UWP XAML Make ListView ScrollVierwer “scrollable”

The Key to successfully make a ListView scrollable is to set a Value to the Height property of the ListView as shown below in the highlighted rows.

<StackPanel Grid.Column="0" Grid.Row="0" Margin="4,2,0,0">
    <uwp:HeaderedTextBlock Text="Header Title"  />
    <ListView x:Name="lvwMyEntities" 
              Height="300"
              ItemsSource="{x:Bind local:Collections.MyEntities}" 
              SelectionMode="Single" 
              MinHeight="150" 
              Grid.Row="0"
              ScrollViewer.VerticalScrollBarVisibility="Visible">
        <ListView.ItemTemplate>
            <DataTemplate x:DataType="local:MyEntity">
                <Grid Width="150" Height="150">
                <Border BorderBrush="DarkGray" BorderThickness="0.5" >

                    <StackPanel Orientation="Vertical" VerticalAlignment="Center"
                                        AllowDrop="true" DragEnter="PnlMyEntity_DragEnter" DragLeave="PnlMyEntity_DragLeave" DragOver="PnlMyEntity_DragOver" Drop="PnlMyEntity_Drop" DropCompleted="PnlMyEntity_DropCompleted">
                        <TextBlock HorizontalAlignment="Center" VerticalAlignment="Top" FontWeight="Bold" Text="{x:Bind DisplayName}" 
                                           FontSize="14" TextWrapping="WrapWholeWords" Margin="2"/>
                        <StackPanel Orientation="Vertical" HorizontalAlignment="Center" VerticalAlignment="Bottom" Background="White">
                                <Image HorizontalAlignment="Center" VerticalAlignment="Bottom" Source="{x:Bind Image}" Stretch="Uniform" />
                        </StackPanel>
                    </StackPanel>
                </Border>
                </Grid>
            </DataTemplate>
        </ListView.ItemTemplate>
        <ListView.ItemsPanel>
            <ItemsPanelTemplate>
                <ItemsWrapGrid x:Name="lvwPnlApo" Orientation="Horizontal"/>
            </ItemsPanelTemplate>
        </ListView.ItemsPanel>
    </ListView>
</StackPanel>


Excel Activate Toolbox to add Buttons for macros/VBA

Problem

You want to add a Button or another Control, like a TextBox or RadioButton to your Excel Worksheet to a specific cell.

Excel does not display the option to add a Button from the ControlBox and/or you cannot add it because the ControlBox’s Input Menu item is grayed out (disabled).

Solution

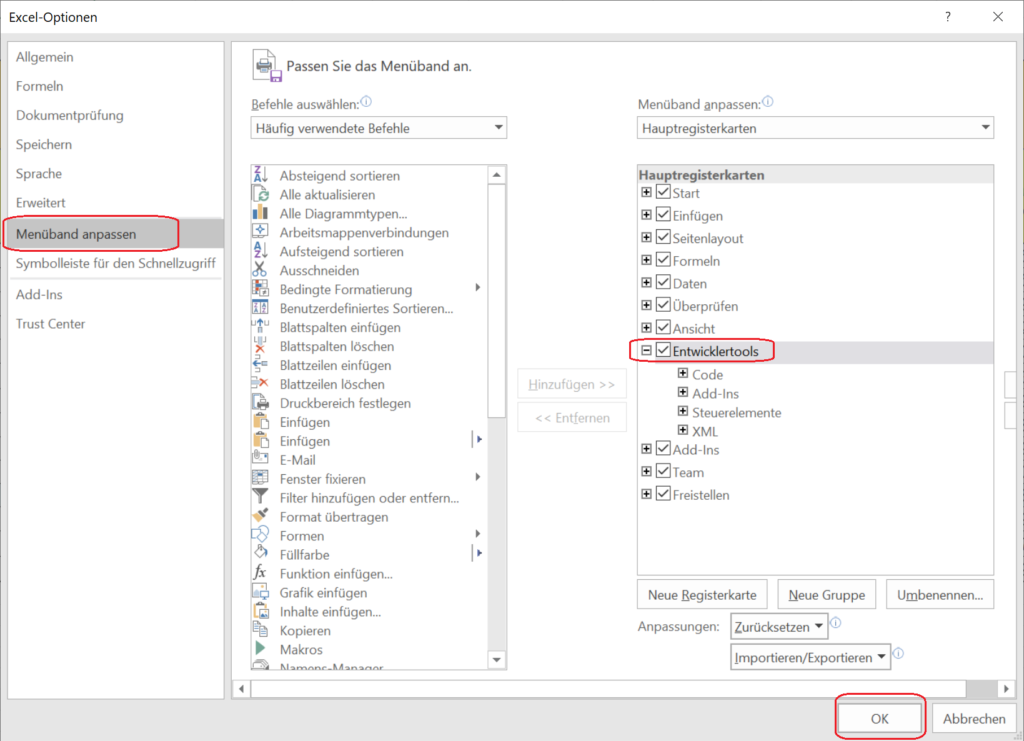
First, you have to add the menu band “Developer Tools” (in German “Entwicklertools”) to be visible. Just right click on the menu band on top of Excel, select Edit Menu band and check the “Developer Tools” option in the right list. See first screenshot.

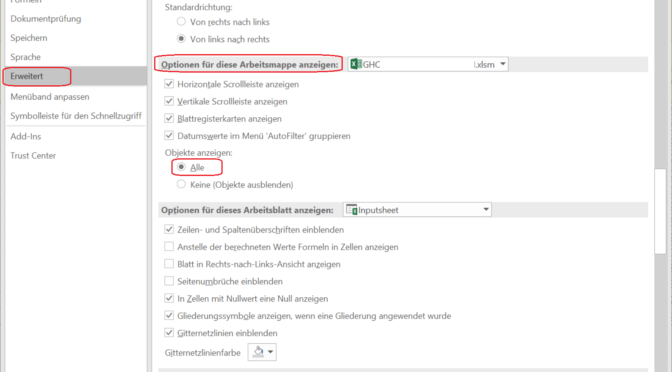
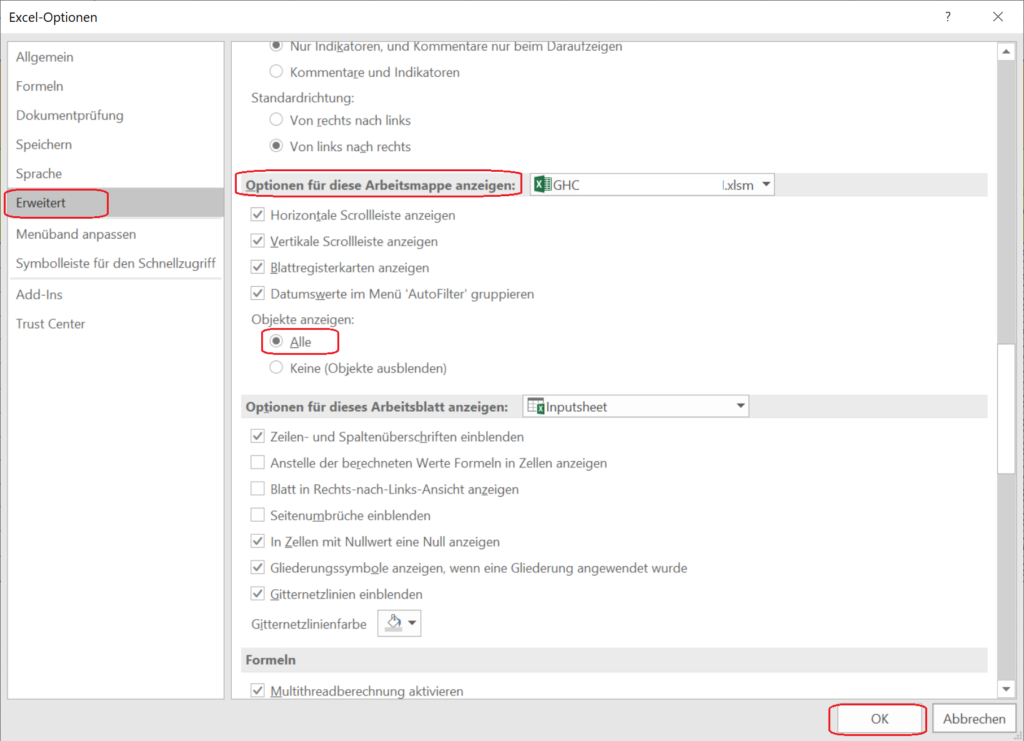
Second, go to File | Options | Advanced | Scroll down to ~half of screen to the group “Displayed options for this workbook: (NAME OF YOU WORKBOOK)” and select “All” for “Displayed objects:” instead of “None (Hide objects)”. See second screenshot for more details.

MDX: Tail

To retrieve the last member of a set you can use the TAIL() function.

The following example returns the total turnover over the last member in 2020-02 for company 4711.

SELECT {
	TAIL(NONEMPTY([DatumStapel].[JMT].[T].Members, { ([Datenherkunft].[Datenherkunft].&[200], [Company].[Company].&[4711], [DatumStapel].[JMT].[M].&[2020]&[2]) }))
} on columns
, { [Measures].[Umsatz] } on rows
FROM [Finance]

MDX: ParallelPeriod with CurrentMember

Problem

You want to create a Calculated Member that displays the Totals of the previous year using ParallelPeriod.

Solution

See below for a Year- and at the end of the post for a Month-based version.
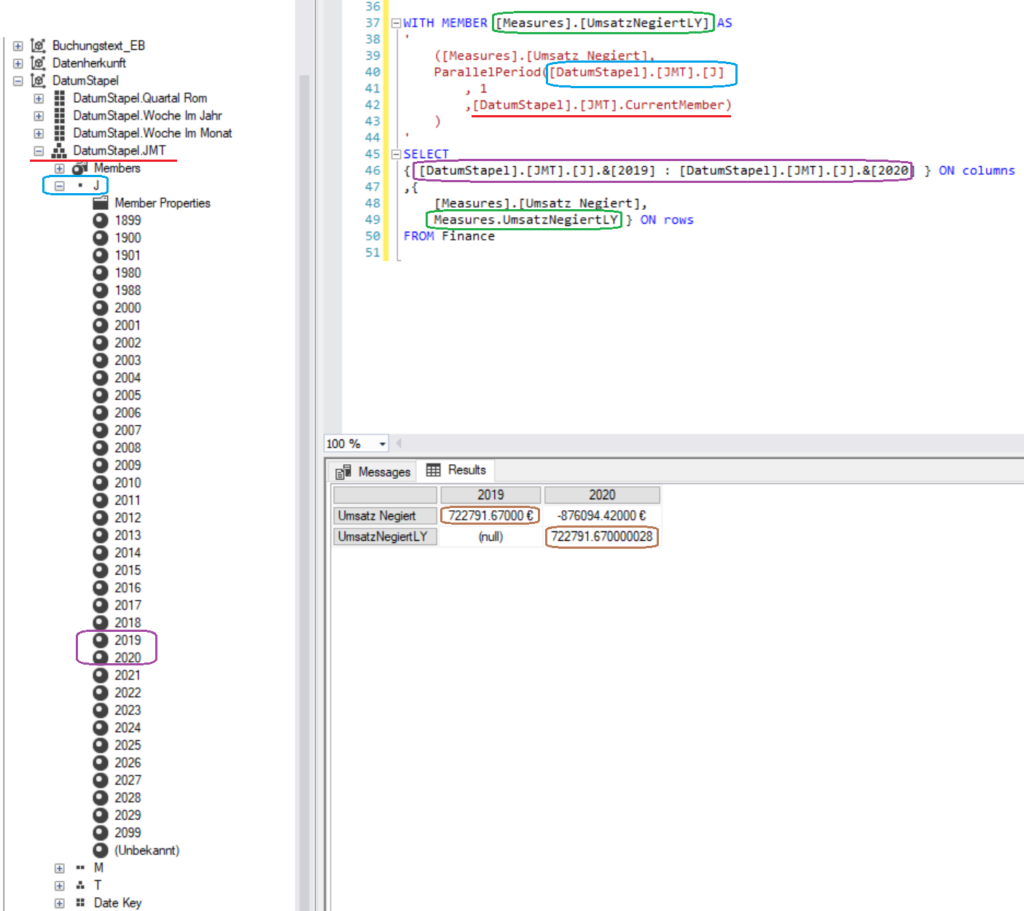
It is important to mention, that the Hierarchy used in ParallelPeriod function is the same Hierarchy used on an axis!
And another clue is, to use CurrentMember property on the hierarchy’s level and not below on a Sub-Level (here: J, M or T)!

WITH MEMBER [Measures].[UmsatzNegiertLY] AS
'
	([Measures].[Umsatz Negiert], 
	ParallelPeriod([DatumStapel].[JMT].[J]
		, 1
		,[DatumStapel].[JMT].CurrentMember)
	)
'
SELECT 
{ [DatumStapel].[JMT].[J].&[2019] : [DatumStapel].[JMT].[J].&[2020] } ON columns
,{
	[Measures].[Umsatz Negiert], 
	Measures.UmsatzNegiertLY } ON rows
FROM Finance

WITH MEMBER [Measures].[UmsatzNegiertLY] AS
'
	([Measures].[Umsatz Negiert], 
	ParallelPeriod([DatumStapel].[JMT].[M]
		, 12
		,[DatumStapel].[JMT].CurrentMember)
	)
'
SELECT 
{ [DatumStapel].[JMT].[M].&[2019]&[1] : [DatumStapel].[JMT].[M].&[2020]&[12] } ON columns
,{
	[Measures].[Umsatz Negiert], 
	Measures.UmsatzNegiertLY } ON rows
FROM Finance

How To: Register CLR Assembly To SQL Server incl. Certificate creation

Following things are important to notice:

  • The VS Project should be set to Build | Optimize code
  • The VS Project must be set to Signning | Sign the assembly with Strong Name Key File ….snk
  • The VS Project must NOT set Signing | Delay sign only
    (this would lead to Msg 10314 Strong Name validation error)
  • Windows SDK with the Strong Name Components must be installed
  • The VS Project must be set to Build events  | Post-build event:
    “C:\Program Files (x86)\Windows Kits\10\bin\10.0.18362.0\x64\signtool.exe” sign /f “$(ProjectDir)YourPrivateCertificate.pfx” /p “YourPfxPassword” $(TargetDir)$(TargetFileName)

    Change the Version number according to your installed SDK^^.
-- Steps:
--	1. Replace Placeholders in this Script
--	2. Create Certificate/Private Key/PFX File
--	3. Adapt your C#/VB .NET Project with the SQL CLR Assembly to use the Certificate (PFX file).
--	4. Make changes to Server Instance to enable Common Language Runtime. Server-Instanz so einstellen, dass die strikte Security deaktiviert wird für CLR.
--	5. Create CLR Assembly in Sql Server.
--  6. (optionally) Drop old CLR Functions.
--	7. Create new CLR Functions.

/* This Article is based on input from: 
	https://github.com/MicrosoftDocs/sql-docs/issues/2052 (Comment of Solomon Rutzky)
	https://nielsberglund.com/2017/07/01/sqlclr-and-certificates/ (Niels Berglund)
	https://nielsberglund.com/2017/07/23/sql-server-2017-sqlclr---whitelisting-assemblies/ (Niels Berglund)
	Regards to all of you - thank you so much for your publishment!
*/

-- 1... 
		/* Replace each of the following Placeholders using Ctrl+H with your own values:
		DWH					->	Database name where the Assembly should be deployed to (excluding [])
		Win10Sdk64bitPath	->	Path to the installation of Windows 10 SDK 64bit:															C:\Program Files (x86)\Windows Kits\10\bin\10.0.18362.0\x64
		CertFolderPath		->	Path to the folder where the Certificate, Private Key and PFX files will be saved (excluding "").	e.g.:	C:\DWH\Certificates
		AssemblyFullPath	->	Full Path to the DLL file to create the CRL Assembly from (excluding "").							e.g.:	C:\DWH\SqlServerClrFunctionsLib.dll
		SqlClrAssemblyName	->	Name of Assembly under which it should be registered in your Database.								e.g.:	ClrFunctions
		CertAuthority		->	Canonical Name of the Certificate's Authority (excluding "")										e.g.:	CompanyName Authority
		CertName			->	Name of the Certificate file (excluding .cer, folders and excluding "")								e.g.:	Assemblies.CompanyName.Public
		CertPvkName			->	Name of the PVK file (excluding .pvk, folders and excluding "")										e.g.:	Assemblies.CompanyName.PrivateKey
		CertPfxName			->	Name of the PFX file (excluding .pfx, folders and excluding "")										e.g.:	Assemblies.CompanyName.PrivateKey
		CertPvkPassword		->	Your strong Private Key Password (excluding "")
		CertPfxPassword		->	Another (less-strong) Password to protect the PFX file (excluding "")
		*/

-- 2....
		-- Use Windows 10 SDK makecert.exe and pvk2pfx.exe to create a (public) Certificate, Private Key and export a PFX file:
		-- https://developer.microsoft.com/de-de/windows/downloads/windows-10-sdk/
		-- 1. "Win10Sdk64bitPath\makecert.exe" -r -pe -n "CN=CertAuthority" -a sha256 -sky signature -cy authority -sv "CertFolderPath\CertPvkName.pvk" -len 2048 -m 144 "CertFolderPath\CertName.cer"
		--		you will be prompted for a Private Key Password - enter: CertPvkName
		--
		-- 2. "Win10Sdk64bitPath\pvk2pfx.exe" -pvk "CertFolderPath\CertPvkName.pvk" -spc "CertFolderPath\CertName.cer" -pfx "CertFolderPath\CertPfxName.pfx" -pi "CertPvkName" -po "CertPfxPassword"

-- 3....

		-- 1. Copy previously created PFX file to the root of your C# .Net Project so that $(ProjectDir) matches the directory of the PFX file.
		-- 2. Sign DLL in Visual Studio using the created PFX file in step 2 by adding the following command to ---->>>> Post Build Event: <<<<<----
		--	"Win10Sdk64bitPath\signtool.exe" sign /f "$(ProjectDir)CertPfxName.pfx" /p "CertPfxPassword" $(TargetDir)$(TargetFileName)
		-- 3. Build Project
		--
		-- 4. Copy your signed DLL to "AssemblyFullPath" of the SQL Server.

-- 4....
		USE MASTER
		GO
		EXEC sp_configure 'show advanced options', 1;
		RECONFIGURE;
		GO
		EXEC sp_configure 'clr_enabled', 1
		RECONFIGURE
		GO	
		EXEC sp_configure 'clr strict security', 0;  
		RECONFIGURE;  
		GO
		-- Re-visit current server configuration (displays a list of all server settings):
		EXEC sp_configure	
		GO  

		/* Optional: Sometimes it might be necessary to change the Owner of the Database to the 'SA' (or 'dbo' or another Server Admin). 
		  -- This might be the case if your Database has been imported/restored from another server (or by another user).

			USE [DWH];
			--SELECT owner_sid FROM sys.databases WHERE database_id = DB_ID('DWH')
			SELECT name FROM sys.database_principals WHERE sid = (SELECT TOP 1 owner_sid FROM sys.databases WHERE database_id = DB_ID('DWH'));
		
			EXEC sp_changedbowner @loginame = 'sa';
		*/
-- 5....

		-- a.) Ensure, the SQL Server Service User (see services.msc and look out for your SQL Server Instance) 
		--		has Read & Execute Permissions to the Assembly File

	USE [DWH]; -- Important to set context to the Database where you want to register your DLL!
	GO
	CREATE ASSEMBLY SqlClrAssemblyName from 'AssemblyFullPath' WITH PERMISSION_SET = UNSAFE	-- use UNSAFE to be aligned with the Permission granted to the Certificate Login previsouly created
	GO
	-- In case of SQL Server Error Message 10134: It might be necessary to add your Assembly to the trusted_assemblies if your Functions won't execute...	
	/*
		SELECT * FROM sys.assemblies a WHERE a.name LIKE '%SqlClrAssemblyName%';
		-- Grab the BINARY of the Assembly file: SELECT content FROM sys.assembly_files WHERE name LIKE '%SqlClrAssemblyName%'
		DECLARE @hash varbinary(64), @clrName nvarchar(4000) 
			= (SELECT name FROM sys.assemblies a WHERE a.name LIKE '%SqlClrAssemblyName%');
		SELECT @hash = HASHBYTES('SHA2_512', (SELECT content FROM sys.assembly_files WHERE name LIKE '%SqlClrAssemblyName%'));
		SELECT @hash as Hash, @clrName as Name;
		EXEC  sp_add_trusted_assembly @hash = @hash, @description = @clrName;
		SELECT * FROM sys.trusted_assemblies
	*/

-- 6.....
	USE [DWH];
	GO
	BEGIN TRAN

		DROP FUNCTION IF EXISTS common.ToBit;
		-- tbd... DROP FUNCTION IF EXISTS ...

		-- in case, you run into trouble and need to re-create the Assembly, execute this after Dropping previously created functions...
		-- DROP ASSEMBLY SqlClrAssemblyName;

-- 7.....		
		GO
		CREATE FUNCTION common.ToBit(@value sql_variant,
			@valueIfNull bit,
			@valueIfConvertError bit) RETURNS bit
			EXTERNAL NAME SqlClrAssemblyName.Scalar.ToBit;
		GO

	COMMIT TRAN

/* After modifying the DLL it might be necessary to apply the following:
	ALTER ASSEMBLY SqlClrAssemblyName from 'AssemblyFullPath' WITH PERMISSION_SET = UNSAFE , UNCHECKED DATA;
	
	-- !! After changing the Certificate of the DLL, you might be required to update the HASH in the trusted_assemblies by re-invoking the Step 5. !!
	-- tbd... Create or Drop & re-create Functions...
*/

Following example C# Scalar.cs file within in Class Library Project and .NET 4.5.2 Target Framework

using System;
using System.Text;
using System.Data.SqlTypes;
using System.Collections;
using System.Globalization;
using System.Collections.Generic;
using System.Text.RegularExpressions;
using Common;
using SqlServerClrFunctionsLib;
using Microsoft.SqlServer.Server;

// TODO: For Unit Testing: Set the following options in this Project's Properties:
//      - Project | Build | Optimize Code => 0
//
// TODO: For Deployment to SQL Server: Set the following options in this Project's Properties:
//      - Project | Build | Optimize Code => 1

/// <summary>
/// Constraints for CLR Functions:
/// https://docs.microsoft.com/en-us/sql/relational-databases/user-defined-functions/create-user-defined-functions-database-engine?view=sql-server-2017
/// 
/// Data Type Mapping:
/// https://docs.microsoft.com/en-us/sql/relational-databases/clr-integration-database-objects-types-net-framework/mapping-clr-parameter-data?view=sql-server-2017
/// Extract: (SQL Server -> System.Data.SqlTypes.* -> .NET CLR Data Type
///     bigint -> SqlInt64 -> Int64, Nullable{Int64}
///     bit -> SqlBoolean -> Boolean, Nullable{Boolean}
///     date -> SqlDateTime -> DateTime, Nullable{DateTime}
///     decimal -> SqlDecimal -> Decimal, Nullable{Decimal}
///     float -> SqlDouble -> Double, Nullable{Double}
///     nvarchar -> SqlChars | SqlString -> String | Char[]         // SQLChars is a better match for data transfer and access, and SQLString is a better match for performing String operations.
///     nvarchar(1) -> SqlChars | SqlString -> Char | Nullable{char}
///     sql_variant -> None -> Object
/// </summary>
public class Scalar
{


    [SqlFunction(DataAccess = DataAccessKind.None, IsDeterministic = true)]
    public static string LTrim(string value, string charsToTrim)
    {
        if (value == null || value == "")
            return value;
        else
        {
            return value.TrimStart(charsToTrim.ToCharArray());
        }
    }

    /// <summary>
    /// Description:	Konvertiert den übergebenen Wert @value in den entsprechenden Ja/Nein (Bit)-Wert (1 Bit).
    /// 				Es werden auch Strings mit Ja/Nein, J/N, Yes/No, Y/N, Si/No, True/False erkannt, sowie X/- erkannt.
    /// 
    /// 				Wenn @value NULL ist, wird @valueIfNull zurückgegeben.
    /// 				Wenn ein Konvertierungsfehler auftritt, wird @valueIfConvertError zurückgegeben.
    /// </summary>
    /// <param name="value"></param>
    /// <param name="valueIfNull"></param>
    /// <param name="valueIfConvertError"></param>
    /// <returns></returns>
    [SqlFunction(DataAccess = DataAccessKind.None, IsDeterministic = true)]
    public static bool? ToBit(Object value, bool? valueIfNull, bool? valueIfConvertError)
    {
    convertStringAgain:
        try
        {
            long lngValue;

            if (value == DBNull.Value)
                return valueIfNull;
            else if (value.GetType() == typeof(SqlBoolean))
                return (bool?)((SqlBoolean)value).Value;
            else if (value is bool)
                return (bool)value;
            else if (value.GetType() == typeof(SqlString))
            {
                string s = ((SqlString)value).Value;
                if (s.StartsWithAny(StringComparison.CurrentCultureIgnoreCase, "J", "Y", "S", "T", "W", "1", "X"))
                    return true;
                else if (s.Length == 0 || s.StartsWithAny(StringComparison.CurrentCultureIgnoreCase, "N", "F", "0", "-", " "))
                    return false;
            }
            else if (value.GetType() == typeof(SqlChars))
            {
                char[] val = ((SqlChars)value).Value;
                char c = val.Length > 0 ? val[0] : ' ';
                if (c.In('J', 'Y', 'S', 'T', 'W', '1', 'j', 'y', 's', 't', 'w', 'X', 'x'))
                    return true;
                else if (c.In('N', 'F', '0', 'n', 'f', '-', ' '))
                    return false;
            }
            else if (value.GetType() == typeof(string))
            {
                value = new SqlString((string)value);
                goto convertStringAgain;
            }
            else if (long.TryParse(Convert.ToString(value), out lngValue))
                return lngValue != 0;

            return valueIfConvertError;
        }
        catch (Exception ex)
        {
            throw new InvalidOperationException(string.Format("Exception when converting the value '{0}' of type '{1}' to Bool! Message: {2}", value, value.GetType().FullName, ex.Message));
        }

    }
	
}

Performance IDENTITY vs SEQUENCE vs GUID

ich habe noch ein wenig nachgeforscht und nun eine gute Erklärung gefunden, warum GUIDs schneller sind als IDENTITYs…

Die Methode NEWSEQUENTIALID() ist ein Wrapper einer Windows API Methode (UuidCreateSequential).

Siehe hier: https://msdn.microsoft.com/de-de/library/ms189786%28v=sql.120%29.aspx und https://msdn.microsoft.com/de-de/library/aa379322%28VS.85%29.aspx

Daher wird auch innerhalb des SQL Servers kein Caching (= Logging) der zuletzt benutzten ID vorgenommen.

Bei IDENTITY ist hard kodiert ein Caching für jeden 10. Wert vorgesehen.

Daher ist hier ein großes Caching-Aufkommen = Logging vorhanden.

Bei einem Restore der DB prüft die Engine den letzten eingetragenen Wert und nimmt den nächsten verfügbaren (erzeugt kein Gap in den IDs).

Zumindest in der Theorie. In der Praxis gibt es ja den Bug mit dem Reseed, bei dem Sie sogar einen Kommentar im connect hinterlassen haben J.

Bei SEQUENCEs ist der Default-Wert fürs Caching 50.

Daher ist jede Sequence bei 1 Mio Zeilen schon mal etwa 1-2 Sekunden schneller als IDENTITY.

Wenn der Wert fürs Caching maximiert wird, dürften Sequences genau so schnell wie GUIDs werden.

Bei einem Restore der DB ist ein (großer) Gap bei den IDs zu erwarten (und zwar entsprechend der nicht genutzten Werte des noch offenen Caches).

Ein guter Artikel der die Performance der SEQUENCEs im Vergleich zu IDENTITYs beleuchtet ist hier:

http://sqlmag.com/sql-server/sequences-part-2

Hier ist noch ein weiterer interssanter Artikel: http://blogs.msdn.com/b/sqlserverfaq/archive/2010/05/27/guid-vs-int-debate.aspx

Test scenario for GUIDs vs. IDENTITY vs. SEQUENCE

See also…

http://www.sqlskills.com/blogs/kimberly/disk-space-is-cheap/

http://www.codeproject.com/Articles/32597/Performance-Comparison-Identity-x-NewId-x-NewSeque

RML Utility for parallel queries… https://support.microsoft.com/en-us/kb/944837

Set up a Table with 6.7 Mio Rows with Sales data (real scenario table).

Add Clustered Index with:

          ID (UUID/GUID/SEQUENCE/IDENTITY)

Add 2 Non-Cl. Indexes for other columns.

Use Foreign Keys to Customer

Foreign Key for SalesDetails to new Sales table.

Set Database and Log File Size to 5GB.

Try different Fill Factors (100 vs. 90 vs. 80 vs. 70 vs. 60 vs. 50 vs. 40 vs. 30 vs. 20)

          – Insert 100.000 Rows using one Batch

          – Insert 1.000 Rows in 100 concurrent sessions at once

  • Measure inserting
  • Measure Selecting using an INNER JOIN on SalesDetails and Customer

Measure IOs using SQL Server Profiler (TSQL_Duration):


VBA: Read DB Schema incl. all Tables and Columns from Access mdb Database

Paste the following VBA Code to a new Module in an empty Excel Worksheet and execute the public sub after editing the File Path and the Password in the Connection String.

Following Reference is required:
Microsoft Office 1[4567].0 Access database engine Object Library

Public Sub ReadAllTablesAndColumnsFromAccessDatabase()
    Dim db As Database, td As TableDef
    Dim fld As Field
    
    Set db = OpenDatabase("C:\Temp\yourAccessDB.mdb", False, True, "MS Access;PWD=PAAAAAASSSSWOOOORRRRDDD")
    
    ' Trap for any errors.
On Error Resume Next
    Dim idxTable As Integer
    Dim rowIdx As Integer
    
    rowIdx = 1
    Dim targetRange As Range
    ' *** Zieltabelle festlegen...
    Set targetRange = ThisWorkbook.Worksheets(1).Cells(1, 1)
    
    For idxTable = 0 To db.TableDefs.Count - 1
        Set td = db.TableDefs(idxTable)
        If Left(td.Name, 4) <> "MSys" And Left(td.Name, 1) <> "~" Then
            For Each fld In td.Fields
                targetRange.Cells(rowIdx + 1, 1).Value = td.Name
                targetRange.Cells(rowIdx + 1, 2).Value = fld.Name
                targetRange.Cells(rowIdx + 1, 3).Value = FieldType(fld.Type)
                targetRange.Cells(rowIdx + 1, 4).Value = fld.Size
                targetRange.Cells(rowIdx + 1, 5).Value = fld.Attributes
                targetRange.Cells(rowIdx + 1, 6).Value = fld.Properties("description")

                rowIdx = rowIdx + 1
            Next fld
            
        End If
    Next idxTable

    db.Close
End Sub

Function FieldType(intType As Integer) As String
    
    Select Case intType
        Case dbBoolean
            FieldType = "dbBoolean"    '1
        Case dbByte
            FieldType = "dbByte"       '2
        Case dbInteger
            FieldType = "dbInteger"    '3
        Case dbLong
            FieldType = "dbLong"       '4
        Case dbCurrency
            FieldType = "dbCurrency"   '5
        Case dbSingle
            FieldType = "dbSingle"     '6
        Case dbDouble
            FieldType = "dbDouble"     '7
        Case dbDate
            FieldType = "dbDate"       '8
        Case dbBinary
            FieldType = "dbBinary"     '9
        Case dbText
            FieldType = "dbText"       '10
        Case dbLongBinary
            FieldType = "dbLongBinary" '11
        Case dbMemo
            FieldType = "dbMemo"       '12
        Case dbGUID
            FieldType = "dbGUID"       '15
    End Select

End Function

Power Query (M-Language) Apply Where Clause to Table DateTime.Now() / GetDate()

If you want to apply a WHERE clause to the Data of a table, for example to limit the result to only valid rows (where GETDATE() between ValidFrom and ValidTo) go to the Advanced Query Editor and add the Table.SelectRows() statement, as follows:

let
    Quelle = Sql.Database("localhost\DWH_DEV", "DWH", [CommandTimeout=#duration(0, 0, 5, 0)]),
    etl_Datastore = Quelle{[Schema="etl",Item="Datastore"]}[Data],
    ds = Table.SelectRows(etl_Datastore, each [ValidFrom] <= DateTime.Date(DateTime.LocalNow()) and [ValidTo] >=DateTime.Date(DateTime.LocalNow()))
in
    ds

SQL Server Connection Packet Size

What is the “best” PacketSize argument to establish a connection to a SQL Server?
The answer is: It depends (on your very specific network)!

In our case a setting of a value higher than 1500 Bytes does not have a positive outcome. That is because the MTU of the Network has a maximum of 1.500 Bytes per Packet. This is often the case, because the implementation of the IP Protocol v2 uses this as the maximum packet size.

To figure out, what is the maximum value in your network, use the following Power Shell Script, originally authored by Thomas Stringer (http://sqlsalt.com), found in this great article by Robert L Davies (http://sqlsoldier.net/wp/sqlserver/networkpacketsizetofiddlewithornottofiddlewith):

$UpperBoundPacketSize = 1500
 
if ($args -eq "-Q") {$QuietMode = 1}
else {$QuietMode = 0}
 
$IpToPing = "mp-bi"
 
do {
    if ($QuietMode -eq 0) {Write-Host "Testing packet size $UpperBoundPacketSize"}
    $PingOut = ping $IpToPing -n 1 -l $UpperBoundPacketSize -f
    $UpperBoundPacketSize -= 1
} while ($PingOut[2] -like "*fragment*")
 
$UpperBoundPacketSize += 1
 
$Mtu = $UpperBoundPacketSize + 28
 
Write-Host "MTU: $Mtu" -ForegroundColor Green

Reset MySQL Root Password On Windows

If the installation took place using the Windows Installer, you need to do the following:

  1. Stop the MySQL service (via services.msc)
  2. Create a Text File with Read Access to Everyone (easiest way) containing the following code. In this example the file is named C:\Temp\mysql_reset_root.txt:
  3. Invoke the following cmd command (depending on your MySQL Version you may adjust the directory name) with Administrative Access:
    In my case after invoking the command it dit not return a value and idled for more than 30 minutes. But I was able to login very shortly.
-- Text File Content of C:\Temp\mysql_reset_root.txt

ALTER USER 'root'@'localhost' IDENTIFIED BY '{YOURNEWPASSWORDHERE}';
-- Run Cmd with Administrator rights...

C:\Program Files\MySQL\MySQL Server 8.0\bin\mysqld --defaults-file="C:\\ProgramData\\MySQL\\MySQL Server 8.0\\my.ini" --init-file=C:\\Temp\\mysql_reset_root.txt

For more information go here… https://dev.mysql.com/doc/mysql-windows-excerpt/5.7/en/resetting-permissions-windows.html

Add Linked Server to OLAP Cube in SQL Server

To use the OpenQuery() procedures within SQL Server to query a SQL Server Analysis Services Cube, you need to add a Linked Server with Credentials of a valid Domain User, as below:

USE [master]
GO

/****** Object:  LinkedServer [CUBE_FINANCEV2]    Script Date: 10/15/2019 11:53:16 AM ******/
EXEC master.dbo.sp_addlinkedserver @server = N'CUBE_FINANCEV2', @srvproduct=N'MSOLAP', @provider=N'MSOLAP', @datasrc=N'mp-bi', @catalog=N'Finance-v2'
 /* For security reasons the linked server remote logins password is changed with ######## */
EXEC master.dbo.sp_addlinkedsrvlogin @rmtsrvname=N'CUBE_FINANCEV2',@useself=N'False',@locallogin=NULL,@rmtuser=N'MUC\mp_BI_SQL_AS',@rmtpassword='########'
EXEC master.dbo.sp_addlinkedsrvlogin @rmtsrvname=N'CUBE_FINANCEV2',@useself=N'True',@locallogin=N'MUC\mp_BI_SQL_AS',@rmtuser=NULL,@rmtpassword=NULL
GO

EXEC master.dbo.sp_serveroption @server=N'CUBE_FINANCEV2', @optname=N'collation compatible', @optvalue=N'false'
GO
EXEC master.dbo.sp_serveroption @server=N'CUBE_FINANCEV2', @optname=N'data access', @optvalue=N'true'
GO
EXEC master.dbo.sp_serveroption @server=N'CUBE_FINANCEV2', @optname=N'dist', @optvalue=N'false'
GO
EXEC master.dbo.sp_serveroption @server=N'CUBE_FINANCEV2', @optname=N'pub', @optvalue=N'false'
GO
EXEC master.dbo.sp_serveroption @server=N'CUBE_FINANCEV2', @optname=N'rpc', @optvalue=N'false'
GO
EXEC master.dbo.sp_serveroption @server=N'CUBE_FINANCEV2', @optname=N'rpc out', @optvalue=N'false'
GO
EXEC master.dbo.sp_serveroption @server=N'CUBE_FINANCEV2', @optname=N'sub', @optvalue=N'false'
GO
EXEC master.dbo.sp_serveroption @server=N'CUBE_FINANCEV2', @optname=N'connect timeout', @optvalue=N'45'
GO
EXEC master.dbo.sp_serveroption @server=N'CUBE_FINANCEV2', @optname=N'collation name', @optvalue=null
GO
EXEC master.dbo.sp_serveroption @server=N'CUBE_FINANCEV2', @optname=N'lazy schema validation', @optvalue=N'false'
GO
EXEC master.dbo.sp_serveroption @server=N'CUBE_FINANCEV2', @optname=N'query timeout', @optvalue=N'0'
GO
EXEC master.dbo.sp_serveroption @server=N'CUBE_FINANCEV2', @optname=N'use remote collation', @optvalue=N'true'
GO
EXEC master.dbo.sp_serveroption @server=N'CUBE_FINANCEV2', @optname=N'remote proc transaction promotion', @optvalue=N'true'
GO


To Query the Processing Status or the last date and time of processing of the Cube, you may create and execute the following Stored Procedure (that uses the created Linked Server from above):

USE [DWH]
GO
/****** Object:  StoredProcedure [etl].[GetCubeProcessingStatus]    Script Date: 14.10.2019 18:21:42 ******/
SET ANSI_NULLS ON
GO
SET QUOTED_IDENTIFIER ON
GO
-- =============================================
-- Author:		Cordt Bien
-- Create date:		29.05.2019
--
-- Last Modified:	Date, Name (short reason.)
--
-- Description:		Returns the date and time of the last processing of a cube or perspective. May return multiple rows.
--
-- Info:			EXEC etl.GetCubeProcessingStatus 'Finance-v2', NULL
--			OR		EXEC etl.GetCubeProcessingStatus 'Finance-v2', 'Datev-Finance'
-- =============================================
CREATE PROCEDURE [etl].[GetCubeProcessingStatus]
		@cubeDatabaseName sysname = 'Finance-v2',	-- must not be null!
		@cubeOrPerspectiveName sysname = NULL		-- optional to limit returned result to one row.
--WITH EXECUTE AS 'InternalExecutor' -- (IF YOU USE THE "WITH EXECUTE AS" clause, the Execution will fail due to Security Context Exceptions of the Linked Server)
AS
BEGIN
	SET NOCOUNT ON;

	-- Check Preconditions
	BEGIN TRY
		IF @cubeDatabaseName IS NULL RAISERROR('cubeDatabaseName must not be null!', 11, 1);

	END TRY
	BEGIN CATCH	
		EXEC internal.ReThrowError @@PROCID;
		RETURN -1;
	END CATCH

	-- Implementation
	BEGIN TRY

		IF @cubeDatabaseName = 'Finance-v2' BEGIN
			SELECT DatabaseName, CubeOrPerspectiveName, CubeOrPerspectiveDisplayName, DATEADD(hour, DATEDIFF(hour, GETUTCDATE(), GETDATE()), LastProcessDate) as LastProcessDate, BaseCubeName 
			FROM OpenQuery(CUBE_FINANCEV2
					, N'SELECT [CATALOG_NAME]  AS DatabaseName,[CUBE_NAME] AS  CubeOrPerspectiveName,[CUBE_CAPTION] AS CubeOrPerspectiveDisplayName,[LAST_DATA_UPDATE] AS LastProcessDate,[BASE_CUBE_NAME] AS BaseCubeName FROM $system.mdschema_cubes WHERE CUBE_SOURCE=1')
			WHERE (@cubeOrPerspectiveName IS NULL OR CAST(CubeOrPerspectiveName as nvarchar(128)) = @cubeOrPerspectiveName);

		END
		ELSE BEGIN
			RAISERROR('A cubeDatabaseName other than "Finance-v2" is currently not supported or implemented! DEV-Info: Add a new linked server to the requested cube and insert it to this stored procedure (etl.GetCubeProcessingStatus).', 11, 1);

			SELECT TOP 0 DatabaseName, CubeOrPerspectiveName, CubeOrPerspectiveDisplayName, DATEADD(hour, DATEDIFF(hour, GETUTCDATE(), GETDATE()), LastProcessDate) as LastProcessDate, BaseCubeName 
			FROM OpenQuery(CUBE_FINANCEV2
					, N'SELECT [CATALOG_NAME]  AS DatabaseName,[CUBE_NAME] AS  CubeOrPerspectiveName,[CUBE_CAPTION] AS CubeOrPerspectiveDisplayName,[LAST_DATA_UPDATE] AS LastProcessDate,[BASE_CUBE_NAME] AS BaseCubeName FROM $system.mdschema_cubes WHERE CUBE_SOURCE=1')
			WHERE (@cubeOrPerspectiveName IS NULL OR CAST(CubeOrPerspectiveName as nvarchar(128)) = @cubeOrPerspectiveName);
		END

	END TRY
	BEGIN CATCH	
		EXEC internal.ReThrowError @@PROCID;
		RETURN -2;
	END CATCH
END
Register C# CLR Assembly in SQL Server

This short article explains the steps necessary to create and deploy a C# Library to SQL Server to use the faster execution of Scalar Functions, e.g. to convert any value to DateTime.

TODO: Describe C# Project and Code

Project Build Steps

Activate the “Optimize Code” and “Delay Sign Only” checkmarks in the Properties of the Project and Compile the Project.

Deployment of Lib to SQL Server

Copy the compiled Lib.dll to a Location on the SQL Server, e.g. C:\DWH\Lib.dll
The SQL Server Database Engine User (see Services) requires Read & Execute Permissions for the File Location.

Execute Script in SSMS to Register Assembly

sp_configure 'clr strict security', 0;  
GO  
RECONFIGURE;  
GO  
USE DWH;
GO

-- DLL neu registrieren...
CREATE ASSEMBLY ClrFunctions from 'C:\DWH\SqlServerClrFunctionsLib.dll' WITH PERMISSION_SET = SAFE;

Register a new Scalar Function

CREATE FUNCTION common.ToDateTime(@value sql_variant,
	@valueIfNull datetime2(7),
	@valueIfConvertError datetime2(7)) RETURNS datetime2(7)
	EXTERNAL NAME ClrFunctions.Scalar.ToDateTime;
GO

Some Scripts for Maintanence

-- When code has been changed within DLL:
	ALTER ASSEMBLY ClrFunctions from 'C:\DWH\SqlServerClrFunctionsLib.dll' WITH PERMISSION_SET = SAFE , UNCHECKED DATA;
-- ^^ it's possible that this step does not succeed. A restart of the Database Engine Service may be required.

-- To Change the Signature of a Function, first drop then re-create function...
BEGIN TRAN

DROP FUNCTION common.ToBit;
GO
CREATE FUNCTION common.ToBit(@value sql_variant,
	@valueIfNull bit,
	@valueIfConvertError bit) RETURNS bit
	EXTERNAL NAME ClrFunctions.Scalar.ToBit;
GO

COMMIT

More Information to Strong Names and its purpose

https://www.codeproject.com/articles/8874/strong-names-explained

Set Database File Permissions to SQL Server Service Account with PowerShell Script

When you change the SQL Server Account or attach Database Files from another computer you may notice the Access Denied error message in SQL Server Management Studio.

To overcome this issue, you may run the following Power Shell script to add the SQL Service User and a userdefined Local Admins Group to each single .mdf, .ldf, .ndf file. Manually setting permissions via Windows Explorer on the parent directory does not change the permissions for each file within.

It might be required to run he Script with elevated Administrative Rights.

function GetFiles($path, [string[]]$exclude) 
{ 
    foreach ($item in Get-ChildItem $path)
    {
        if ($exclude | Where {$item -like $_}) { continue }

        if (Test-Path $item.FullName -PathType Container) 
        {
            $item.FullName
            GetFiles $item.FullName $exclude
        } 
        else 
        { 
            $item.FullName
        }
    } 
}

function SetPermissions($file)
{
    if ($file -like "*.mdf" -or $file -like "*.ndf" -or $file -like "*.ldf" -or $file -like "*.ndf*")
    {
        $acl = Get-Acl $file
        $AccessRule = New-Object System.Security.AccessControl.FileSystemAccessRule("{YOURDOMAIN}\{SQLSERVERDATABASEENGINESERVICEACCOUNT}","FullControl","Allow")
        $acl.SetAccessRule($AccessRule)
        $acl | Set-Acl $file

        $acl = Get-Acl $file
        $AccessRule = New-Object System.Security.AccessControl.FileSystemAccessRule("{LOCALSERVER}\{LOCALSERVERADMINSGROUP}","FullControl","Allow")
        $acl.SetAccessRule($AccessRule)
        $acl | Set-Acl $file
    }
    else 
    {
        $file
    }
}

# First Directory to iterate recursively...
foreach ($file in GetFiles("G:\DWH"))
{
    SetPermissions($file)
}

# Second Directory to iterate recursively...
foreach ($file in GetFiles("P:\DWH"))
{
    SetPermissions($file)
}

Create dbo.SysSSISLOG Table in your Database

When you script your database and want to include the dbo.SYSSSISLOG table, because you’ve created Views or procedures referencing it, the following piece of code does the job:

if not exists (select * from dbo.sysobjects where id = object_id(N'[dbo].[sysssislog]'))
CREATE TABLE [sysssislog] (	[id] [int] NOT NULL IDENTITY PRIMARY KEY,	[event] [sysname] NOT NULL,	[computer] [nvarchar] (128) NOT NULL,	[operator] [nvarchar] (128) NOT NULL,	[source] [nvarchar] (1024) NOT NULL,	[sourceid] [uniqueidentifier] NOT NULL,	[executionid] [uniqueidentifier] NOT NULL,	[starttime] [datetime] NOT NULL,	[endtime] [datetime] NOT NULL,	[datacode] [int] NOT NULL,	[databytes] [image] NULL,	[message] [nvarchar] (2048) NOT NULL,) ON [PRIMARY] TEXTIMAGE_ON [PRIMARY]
go
CREATE PROCEDURE [dbo].[sp_ssis_addlogentry]  @event sysname,  @computer nvarchar(128),  @operator nvarchar(128),  @source nvarchar(1024),  @sourceid uniqueidentifier,  @executionid uniqueidentifier,  @starttime datetime,  @endtime datetime,  @datacode int,  @databytes image,  @message nvarchar(2048)AS  INSERT INTO sysssislog (      event,      computer,      operator,      source,      sourceid,      executionid,      starttime,      endtime,      datacode,      databytes,      message )  VALUES (      @event,      @computer,      @operator,      @source,      @sourceid,      @executionid,      @starttime,      @endtime,      @datacode,      @databytes,      @message )  RETURN 0
go
execute [sp_MS_marksystemobject] N'[dbo].[sp_ssis_addlogentry]'
go
execute [sp_MS_marksystemobject] N'[sysssislog]'
go

The previous script is the same code that Visual Studio or SSIS itself executes when running a ETL Package the first time.

Embracing your Transact-SQL Code and Coding Tips.